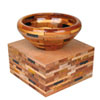
How To Turn A Bowl
July 14th, 2008What you need to get started
Turning Tools
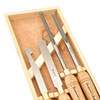 We recommend a HSS (High Speed Steel) roughing gouge, skew chisel, bowl gouge, and a scraper. Make sure your tools are sharp. Dull tools can tear out the grain and ruin projects. Include a 2" Forstner bit (or a bit that matches your lathe chuck’s jaws) to drill a mounting hole for your lathe chuck.
Lathe Chuck
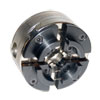 Use a good quality self-centering chuck system with round jaws that can grip either outside or inside. A set of flat (jumbo) jaws will make final finishing easier.
Wood
 Don’t cut down a tree yet! The easy way to start is using one of our pre-dried bowl blanks for a fast and easy start. One of our 2"x 5"x 5"or 2"x 6"x 6"wood blanks is a great starting point,especially if you have a mini or midi lathe.
Getting Started
 Mark the blank corner to corner. Then draw a circle to the approximate outside diameter of your bowl.
Use a band saw to cut away the wood around the outside of the circle, this will avoid your having to turn off the excess wood. Next, drill a 2"hole 1/2"deep in the center of the blank. Make a drawing of the profile of the bowl as you would like to see it finished.
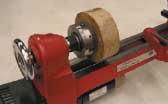
Mount your lathe chuck with the round jaws installed onto the headstock of the lathe. Mount the blank by pressing the drilled hole onto the jaws. Spread the jaws to lock the blank in place. Rotate the blank by hand to make sure that the wood is secure and stable and spinning without serious wobbling. Adjust the wood and retighten as necessary.
Turn the outside
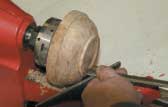 Start by using a roughing gouge, begin at the base of the bowl where most of the wood will be removed and work towards the rim. Keep your drawing nearby and continue shaping the outside surface using a bowl gouge and skew to duplicate your profile. You will be turning the bowl around to turn the inside next but first turn a spigot for an outside grip (turn a recessed hole for an inside grip) on the chuck.
Sanding the outside
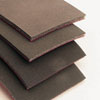 Use graduated grits to smooth and sand the outside surface. Polish the surface with a finish of your choice. Shellawax liquid is an excellent choice. A food safe polish will have to used if the bowl is going to be used for food.
Hollow the inside
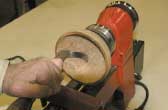 Remove the blank from the chuck and reverse it. Use the chuck jaws to grab the turned spigot (or insert into the hole) to secure the blank. Tighten the bowl in the chuck. Again hand turn the blank to test for wobbling and alignment. Make any adjustments as necessary before starting the inside surface.
To simplify turning the inside use a “S” toolrest in the place of your straight toolrest. Use the bowl gouge and scraping tools to reduce and smooth the inside of the bowl. Use a wall thickness gauge to make sure you don’t exceed the wall thickness you want to achieve (for a small bowl, 3/8" is typical). Also, be careful here because if you remove too much material it’s possible that you can break through the wall or bottom of your bowl. Once you’re finished turning the inside, sand and finish repeating the same sequence of sandpapers and finishes as you used for the outside.
The final step 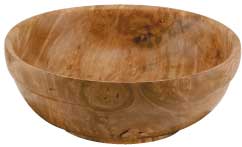
Finishing the bottom of the bowl.The easiest way to accomplish this step is using a set of flat jaws on your chuck. Remove the round jaws and replace them with the flat (jumbo) jaws. Carefully mount the bowl with the rim gripped by the pins on the jaws. Carefully part off the excess wood on the base. Sand and finish. Now your bowl is complete. Allow all bowls, where a food safe polish was used, to cure for at least 24 hours.